Jewelry Surface Design in CAD: From Digital Texture to Finished Metal
A jewelry piece may first be recognized by its silhouette, gemstones, or proportions, but its surface is what gives it a distinct character. A polished plane can make a ring feel architectural and precise. Fine engraving can introduce symbolism, history, or personalization. Hammered metal may suggest traditional craftsmanship, while frosted recesses can create contrast around raised lettering, monograms, or sculpted relief.
For this reason, jewelry surface design should never be treated as a decorative decision added after the main model is complete. Surface character must be considered throughout 3D jewelry CAD design, printing, casting, stone setting, polishing, photography, video rendering, and long-term maintenance.
A texture that appears clearly in a CAD viewport may soften or disappear after casting. An engraving that looks refined on screen may be too shallow to survive polishing. A matte surface may appear smooth in a jewelry rendering but prove difficult to finish consistently if the surrounding geometry is inaccessible. Highly polished areas can create beautiful reflections while also revealing every weakness in the underlying model.
Professional jewelry surface design therefore requires more than visual taste. It demands an understanding of geometry, scale, material behavior, manufacturing limits, and how light interacts with finished metal.
The quality of a luxury piece is often determined not by the number of details applied to it, but by how successfully those details survive from the digital model to the finished jewelry.
Digital Texture in 3D Jewelry CAD Design
Digital modeling software can create extremely fine lines, perfectly sharp corners, microscopic patterns, and uniformly repeated textures. Physical jewelry production has very different limitations.
Once a model is prepared for 3D printing, every detail is affected by print resolution, resin quality, casting behavior, metal flow, cleanup, polishing, and the skill of the finishing team. A texture that is highly visible under digital lighting may become weak after several manufacturing stages. Narrow recessed lines can partially close during casting. Raised patterns may lose sharpness during polishing, while small repeated elements can merge into visual noise.
This is why texture must be designed according to the complete production process rather than judged only inside the CAD software.
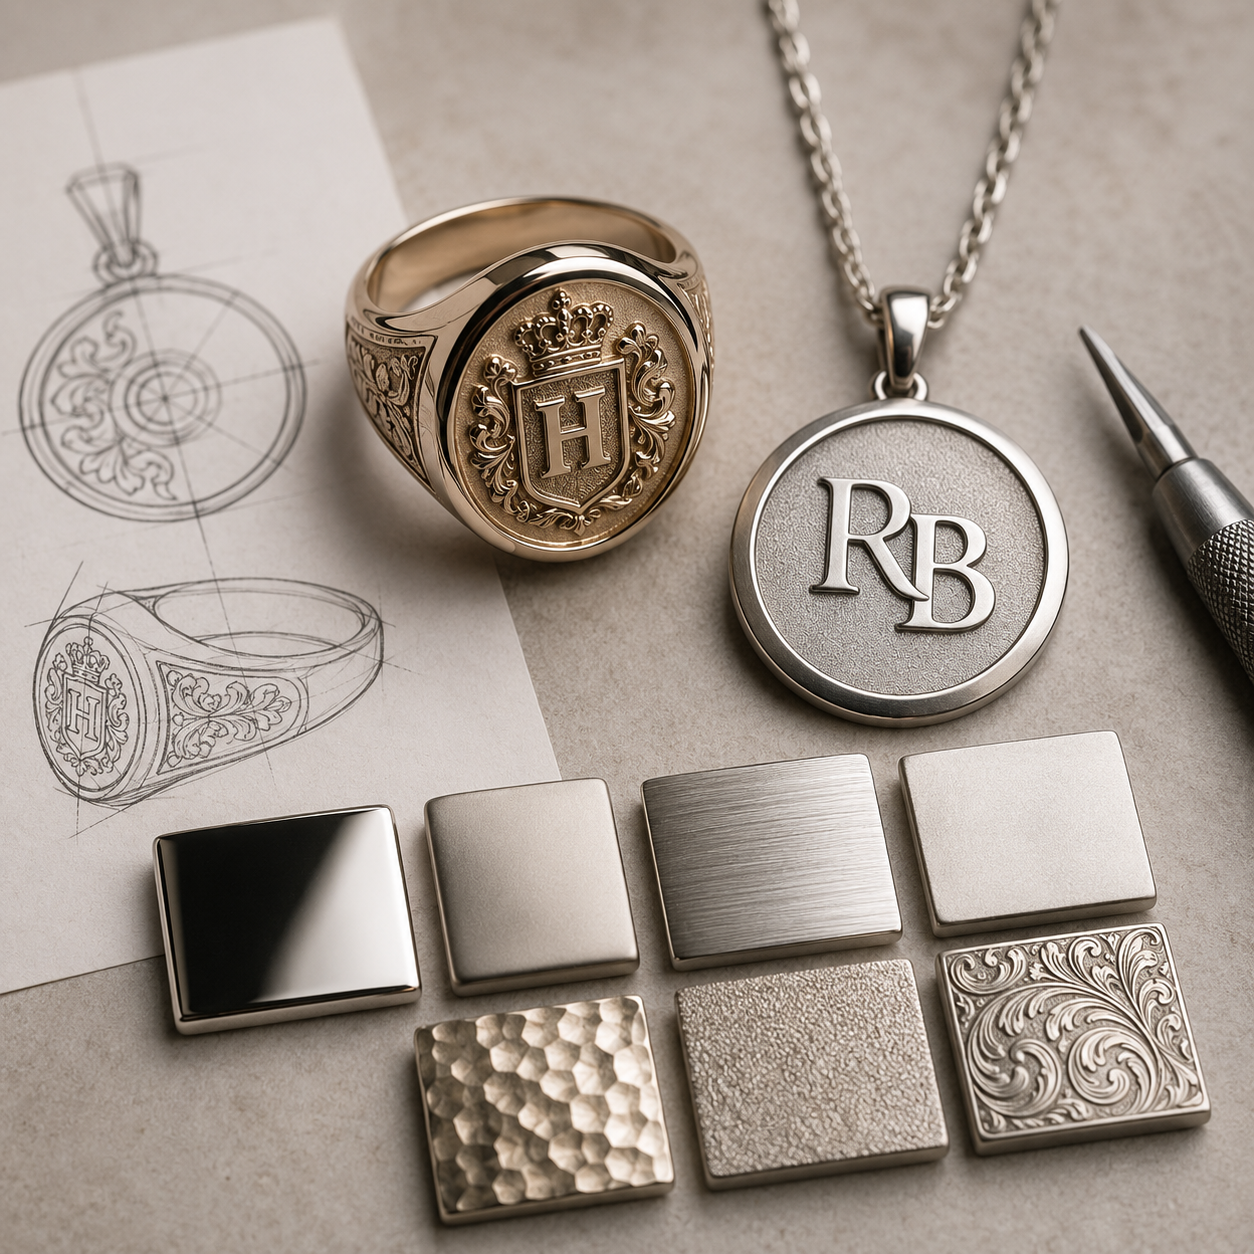
Consider a signet ring with a deeply engraved crest. The engraving needs enough depth and separation to remain readable after casting and finishing. However, excessive depth may create difficult cleanup areas, trap polishing compound, or leave weak metal between closely positioned details.
A pendant with a frosted background and polished lettering needs a clear height difference between the two finishing zones. If the transition is too shallow, the polished letters may lose definition. If the recessed background is too deep or narrow, it may become difficult to finish evenly.
Hammered metal creates another challenge. A successful hammered texture should appear irregular and handcrafted, yet the pattern still needs visual control. If the marks are too uniform, the surface can look artificial. If they are too random or too deep, the design may appear damaged rather than intentionally textured.
Professional metal texture design begins by deciding which details should exist as physical geometry and which should be applied later through hand engraving, laser work, bead blasting, brushing, stippling, or another finishing technique.
Not every visual effect needs to be modeled. Some jewelry surface finishes are better created by the workshop after casting. Others must be included in the jewelry CAD model because they define the form, depth, or identity of the piece.
Making that distinction improves file quality and gives the manufacturer a clearer production strategy.
Jewelry Engraving Design Requires Production Awareness
Engraving is common in custom jewelry CAD, particularly in signet rings, wedding bands, memorial pieces, pendants, crests, monograms, family symbols, handwriting, fingerprints, and personalized jewelry.
The success of a jewelry engraving design depends on much more than the artwork itself. The designer must consider line width, depth, spacing, curvature, viewing distance, finishing access, and the method used to produce the engraving.
Text placed inside a wedding band requires different preparation from a crest engraved into a broad signet-ring face. A phrase running around a curved pendant must remain readable as the surface turns away from the viewer. A raised monogram needs enough separation between the letters and background to cast clearly without becoming unnecessarily heavy.
Typography is particularly sensitive at jewelry scale.
Thin scripts may appear graceful in a large digital preview but become fragile or unreadable once reduced to the size of a ring or pendant. Small enclosed areas within letters can close during printing, casting, or polishing. Highly decorative fonts may need careful simplification so their identity remains recognizable in metal.
In engagement ring CAD, engraving may appear inside the shank, beneath the center setting, or around the gallery. These locations can add personal meaning, but they also present technical concerns. The engraving should not weaken a thin section, interfere with future resizing, or create difficult polishing areas.
A production-aware jewelry CAD model does not simply project text onto a surface. It adjusts the artwork to suit the scale, curvature, material, and manufacturing method of the piece.
The same principle applies to portraits, logos, handwriting, and fingerprints. A photographic image cannot always be transferred literally into metal. The artwork may need to be interpreted as controlled lines, relief levels, or tonal areas that will remain recognizable after production.
Accuracy is not always achieved by preserving every visual detail. In fine jewelry engraving, accuracy means preserving the meaning and identity of the original image in a form that can be manufactured successfully.
Jewelry Surface Finishes Change How Form Is Perceived
Jewelry surface finishes do more than change the texture of metal. They influence how the shape, weight, and proportions of a piece are perceived.
High-polish metal creates sharp reflections and strong highlights. It can make a curved ring appear fluid and luxurious, but it also exposes uneven transitions and poor surface continuity. If the shoulder of a ring is not blended cleanly into the shank, a polished render may reveal a break that was not obvious in the basic CAD viewport.
Matte, satin, brushed, frosted, and sandblasted finishes reduce sharp reflections and place more emphasis on the underlying form. They can make a broad pendant feel calmer and more architectural or create contrast against polished edges and raised details.
However, these finishes are not interchangeable.
A brushed surface has visible direction. Satin finishing produces a softer, more controlled grain. Frosted metal scatters light more evenly. Hammered surfaces create changing localized reflections. Sandblasting produces a fine granular quality, while Florentine finishing creates a recognizable crosshatched surface.
Professional jewelry rendering should communicate these differences accurately. Simply reducing the gloss of a material is not enough.
These finishing choices also influence manufacturing.
When a polished border surrounds a matte center, the geometry should provide a clear boundary between the two zones. A raised edge may protect the matte field during polishing. A recessed background can help separate finishes, but it must remain accessible to tools.
Decorative textures placed too close to prongs, pavé stones, hinges, or narrow openings may be difficult to finish consistently. The sequence of polishing and stone setting may also affect which surface treatments are practical.
In pendant CAD modeling, mixed jewelry surface finishes can create depth without adding more stones. A polished emblem may stand out strongly against a frosted background. In a men’s ring, brushed metal can soften a large area while polished bevels define the silhouette. In sculptural jewelry, selective polishing can highlight raised elements and leave recesses visually darker.
Surface finish is therefore part of the architecture of the piece. It should be planned during 3D jewelry CAD design rather than decided casually after casting.
Jewelry Rendering Must Represent Surface Character Honestly
Jewelry rendering becomes especially important when a design depends on engraving, texture, or multiple finishing zones. A technically accurate model may still be difficult for a client or brand owner to understand until realistic materials and lighting are applied.
High-resolution still images can show the contrast between polished and matte areas, the depth of engraved lines, and the rhythm of repeated textures. Close-up renderings can reveal details that would be difficult to communicate through technical measurements alone.
Video rendering provides a different form of evaluation.
As the jewelry rotates, light moves across the surface. Brushed metal reveals the direction of its grain. Hammered texture produces shifting highlights. Engraved lines move between shadow and reflection. Polished bevels become visible as narrow highlights travel across their edges.
This makes jewelry animation particularly valuable for surface-led designs.
However, visualization must remain faithful to the intended manufacturing result. Textures should not be exaggerated simply to make them easier to see. Engraving should not appear deeper than the production geometry. Polished surfaces should not be made unrealistically perfect when the physical design includes areas that will be difficult to access or finish.
Another common mistake is applying one uniform material to a piece that will contain several different surface treatments. A render may look attractive, but it fails to communicate how the finished jewelry is intended to appear.
Lighting should also be chosen carefully. Flat lighting may make matte metal appear lifeless, while overly dramatic lighting can make engraved details appear deeper than they really are.
Accurate jewelry rendering should clarify the intended jewelry surface design. It should not disguise manufacturing limitations or create unrealistic expectations.
This matters particularly when rendered images are used before physical samples exist. The visualization may influence design approval, pricing, merchandising, and customer expectations. If the manufactured surface differs significantly from the approved imagery, confidence can be weakened even when the finished piece is technically well made.
Surface Detail Influences Jewelry Manufacturing and Repair
Jewelry surface design interacts with every stage of production.
During casting, deep recesses and tightly spaced patterns can affect metal flow and cleanup. During stone setting, nearby textures may be damaged by tools or distorted by pressure. During polishing, raised details can soften and engraved lines may lose depth. During repair, matching an unusual texture may be more difficult than restoring a plain polished surface.
These concerns should influence the original jewelry CAD modeling.
A pavé ring with engraved areas between the stone rows needs enough space for both setting and finishing. A textured pendant with a high-polish bail should allow the bail to be polished without damaging the surrounding surface. A sculpted signet ring may need stronger relief near exposed edges where wear is most likely.
The order of production also matters. Some textures are applied before stone setting, while others are completed afterward. Certain areas may remain unfinished until assembly is complete. Multi-part jewelry may require individual components to be polished and textured before they are joined.
Long-term maintenance deserves equal attention.
High-polish jewelry can be refinished, but every polishing removes a small amount of metal. Fine engraving near exposed edges may gradually soften. A deep texture may hide everyday scratches effectively, but it can be difficult to reproduce if the jewelry is repaired later.
Strong jewelry surface design considers how the piece will age, not only how it will look when newly finished.
A design that appears impressive only on the day of completion may offer less long-term value than one whose texture, engraving, and finishing can develop naturally while preserving the identity of the piece.
Building a Consistent Surface Language Across a Collection
Surface character can become a recognizable part of a jewelry brand’s identity. A collection may be defined by engraved borders, sculpted relief, polished bevels, frosted recesses, linear brushing, or a distinctive hammered pattern.
Maintaining this identity across rings, pendants, earrings, bracelets, and different product sizes requires careful control.
The same texture cannot always be copied at the same scale. A hammered pattern that works on a wide cuff may appear too coarse on a narrow wedding band. An engraving depth suitable for a pendant may be excessive on a small earring. A decorative pattern may need broader spacing on a ring and finer detailing on a larger object.
Professional 3D jewelry CAD design allows a surface language to be adapted rather than duplicated mechanically.
Jewelry rendering can support this process by presenting the entire collection under consistent lighting. Designers can compare whether the finishes feel related, whether the texture scale remains appropriate, and whether polished details appear in the correct locations.
Video can show whether each piece responds to light in a consistent way. This is valuable when presenting a collection that should feel unified without becoming repetitive.
The goal is not exact sameness. It is controlled continuity.
Each piece should function at its own scale while preserving the same approach to craftsmanship, engraving, texture, and surface refinement.
Jewelry Surface Design Is a Form of Technical Craftsmanship
Engraving, texture, and finishing are often described as decorative features. In professional jewelry manufacturing, they are technical decisions that influence printability, casting, stone setting, polishing, visualization, wear, maintenance, and repair.
3D jewelry CAD design provides the tools to control these details before production, but digital freedom must be guided by manufacturing knowledge. Fine engraved lines need realistic depth. Raised patterns need enough strength. Mixed jewelry surface finishes need clear boundaries. Textures must be appropriate for both the material and the scale of the piece.
Jewelry rendering becomes the visual test of those decisions. Still images communicate texture, engraving, and contrast. Video reveals how the surface responds to light and movement. Both should remain faithful to the geometry and finishing techniques intended for production.
For CADVANCE, jewelry surface design is where digital precision and physical craftsmanship become closely connected. The CAD model establishes the structure, the workshop gives the design material reality, and the final finish determines how the jewelry is experienced.
A well-designed surface does far more than decorate a piece. It controls light, communicates identity, supports manufacturing, and gives finished jewelry a character capable of lasting beyond its first impression.